Let's Encrypt でワイルドカード証明書を発行する
お名前COMにあるドメインで、Let's Encrypt のワイルドカード証明書を発行する
Certbot Version 0.22.0よりワイルドカード証明書が取得可能になりまたので、お名前COMで運用しているドメインで「Let's Encrypt」をワイルドカード証明書を取得しました。
「Let's Encrypt」で、ワイルドカード証明書を利用する場合は、DNSのTXTレコードが設定できないと使用できません。お名前COMではTXTレコードの設定ができるので、ワイルドカード証明書を発行する事ができます。
Let's Encrypt のワイルドカード証明書を発行する
certbotをインストールしていない場合は、下記の手順で「certbot」をインストールします。また、動作確認はCentoS 7でおこなっています
yum install -y --enablerepo=epel certbot
次にワイルドカード証明書を取得していきます、certbot の下記のコマンドとなります。
ドメイン、メールアドレスは自分の環境に合わせて下さい
書式:certbot certonly --manual --domain *.[ドメイン] --email [メールアドレス] --agree-tos --manual-public-ip-logging-ok --preferred-challenges dns-01 --server https://acme-v02.api.letsencrypt.org/directory
コマンドを実行すると、下記のようになります。最後に「Press Enter to Continue」となりますが、Enterキーを押さずにしておいて下さい。Enterキーを押した場合は再度同じコマンドを実行すればいいです。
# certbot certonly --manual --domain *.example.com --email info@example.com --agree-tos --manual-public-ip-logging-ok --preferred-challenges dns-01 --server https://acme-v02.api.letsencrypt.org/directory
Saving debug log to /var/log/letsencrypt/letsencrypt.log
Plugins selected: Authenticator manual, Installer None
Starting new HTTPS connection (1): acme-v02.api.letsencrypt.org
Obtaining a new certificate
Performing the following challenges:
dns-01 challenge for example.com

- - - - - - - - - - - - - - - - - - - - - - - - - - - - - - - - - - - - - - - -
Please deploy a DNS TXT record under the name
_acme-challenge.logic-products.com with the following value:

xxxxxxxxxxxx-xxxxxxxxxxx_xxxxxxxxxxxx #[半角英数字の文字]

Before continuing, verify the record is deployed.
- - - - - - - - - - - - - - - - - - - - - - - - - - - - - - - - - - - - - - - -
Press Enter to Continue
次にDNSでTXTレコードを設定するにあたり、必要な情報をメモしておきます。
上記コマンドを発行した際に表示される箇所で、「_acme-challenge.example.com」の値と、その下にある、半角英数字の文字 が必要です
- - - - - - - - - - - - - - - - - - - - - - - - - - - - - - - - - - - - - - - -
Please deploy a DNS TXT record under the name
_acme-challenge.example.com with the following value:
Kmdsfee9d3e0B4aS-SSJele86sEnMg_J7eladeD8
Before continuing, verify the record is deployed.
- - - - - - - - - - - - - - - - - - - - - - - - - - - - - - - - - - - - - - - -
※必要な箇所の抜粋、半角英数字は適当な値に変更しています
お名前COMでDNS設定をおこなう
お名前COMでDNSのTXTレコードの設定をおこないます。
DNSレコードの設定でTXTレコードを選択して、ホスト名に「_acme-challenge.example.com」とVALUEに「半角英数字の文字」を設定します
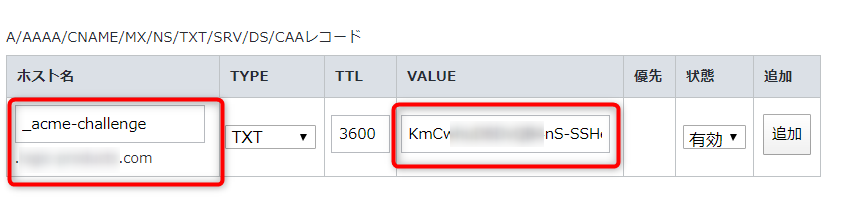
入力が終わったらDNSレコードの追加します。追加した内容の確認画面では以下のようになるかと思います。
DNSレコードの反映には10~30分かかるかと思います。

10分から20分ほど経過したら、先程設定したDNSレコードが反映しているかdigコマンドで確認します。
「dig -t TXT _acme-challenge.example.com @8.8.8.8」とすれば、TXTレコードが反映しているか確認できます
$ dig -t TXT _acme-challenge.example.com @8.8.8.8

; <<>> DiG 9.11.4-P2-RedHat-9.11.4-9.P2.el7 <<>> -t TXT _acme-challenge.example.com @8.8.8.8
;; global options: +cmd
;; Got answer:
;; ->>HEADER<<- opcode: QUERY, status: NOERROR, id: 24006
;; flags: qr rd ra; QUERY: 1, ANSWER: 1, AUTHORITY: 0, ADDITIONAL: 1

;; OPT PSEUDOSECTION:
; EDNS: version: 0, flags:; udp: 512
;; QUESTION SECTION:
;_acme-challenge.logic-products.com. IN TXT

;; ANSWER SECTION:
_acme-challenge.logic-products.com. 3579 IN TXT "xxxxxxxxxxxx-xxxxxxxxxx_xxxxxxxxx"
ワイルドカード証明書をApacheに設定する
DNSのTXTレコードが反映しているのを確認したら、さきほどコンソールでEnterキーを押す手前で止まっていた画面でEnterキーを押します
IMPORTANT NOTES:
 - Congratulations! Your certificate and chain have been saved at:
   /etc/letsencrypt/live/example.com-0001/fullchain.pem
   Your key file has been saved at:
   /etc/letsencrypt/live/example.com-0001/privkey.pem
   Your cert will expire on 2019-04-26. To obtain a new or tweaked
   version of this certificate in the future, simply run certbot
   again. To non-interactively renew *all* of your certificates, run
   "certbot renew"
 - If you like Certbot, please consider supporting our work by:

   Donating to ISRG / Let's Encrypt:   https://letsencrypt.org/donate
   Donating to EFF:                    https://eff.org/donate-le
各ファイルが発行されているか確認します。ディレクトリのドメイン名は自分の環境で変更して下さい
# ls /etc/letsencrypt/live/example.com-0001/
cert.pem  chain.pem  fullchain.pem  privkey.pem  README
次に、取得したワイルドカード証明書をApacheの設定を変更して、Apacheを再起動して設定を反映します
※SSL証明書の箇所のみ抜粋しています
$ sudo vim /etc/httpd/conf.d/vhosts/example.com.conf
SSLCertificateFile /etc/letsencrypt/live/example.com-0001/cert.pem
SSLCertificateKeyFile /etc/letsencrypt/live/example.com-0001/privkey.pem
SSLCertificateChainFile /etc/letsencrypt/live/example.com-0001/chain.pem

$ sudo systemctl restart httpd
\ 最新情報をチェック /