カゴヤ・クラウド/VPSの、Cent OS 7.x に muninをインストール
サーバーの負荷などの情報は、外部監視(SavaMoni)で監視していますが、Apache、MariaDBなどの負荷状況を監視できないので、Muninをインストールしました。
本ブログでもMuninのインストールを紹介していますが、今回はカゴヤ・クラウド/VPSのCent OS 7にインストールしています
Muninをインストール
EPELを利用してインストールするので、EPELの設定をおこないます。
# wget http://ftp.riken.jp/Linux/fedora/epel/RPM-GPG-KEY-EPEL-7
# rpm --import RPM-GPG-KEY-EPEL-7
# rm -f RPM-GPG-KEY-EPEL-7

# 以下の内容で新規作成
# vi /etc/yum.repos.d/epel.repo

[epel]
name=EPEL RPM Repository for Red Hat Enterprise Linux
baseurl=http://ftp.riken.jp/Linux/fedora/epel/7/$basearch/
gpgcheck=1
enabled=0
muninのインストールは、yumを利用しているおこないます。EPELは普段は利用しない設定(enabled=0)としているので、yumを利用時は「–enablerepo=epel」とオプションを利用します
# yum --enablerepo=epel install munin munin-node munin-cgi
muninの設定ですが、一台でサーバーとクライアントを動かしているので設定変更を特にしなくても動きますので、何も変更していません。設定ファイルは以下の場所にあります
muninの設定ファイルは「/etc/munin/munin.conf 」なります。
ApacheのMuninの設定ファイルは「/etc/httpd/conf.d/munin.conf 」になります
Basic認証のユーザーとパスワードを設定します
# htpasswd -c /etc/munin/munin-htpasswd admin
# パスワード設定します
New password:
Re-type new password:
Adding password for user admin
Muninの設定を有効にするので、Apacheを再起動し、Muninの自動起動をOnにします
apacheの設定を有効にするので再起動します
# systemctl restart httpd

muninを起動し、自動起動をONにします
# systemctl start munin-node
# systemctl enable munin-node
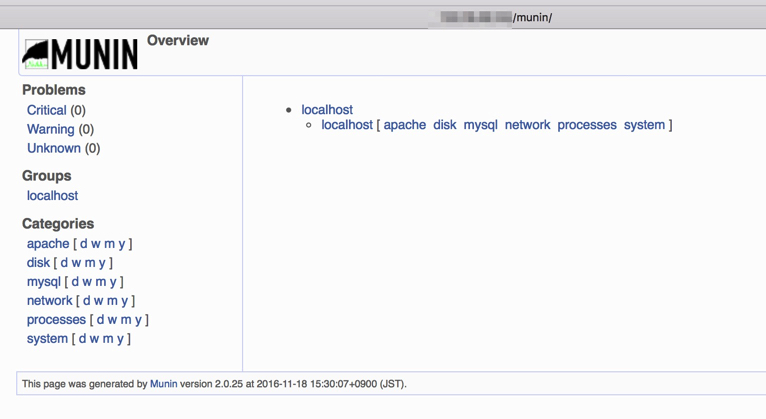
ブラウザでMuninのHPにアクセスします。URLはIPアドレス/munin/となります。アクセス時はBasic認証となるので、ユーザー名とパスワードを入力します
グラフが表示されない場合は、Cronで実行され値を取得しているので5分ほどおいてからアクセスすれば表示されると思います
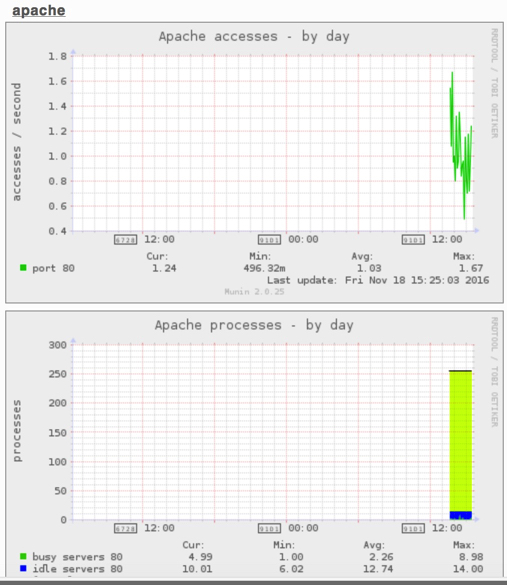
Apacheで状態をグラフに表示する
MuninでApacheのプロセス数や負荷状況を表示をできるようにMuninの設定をおこないます
Apacheのステータスを表示する「mod_status.so」を有効にします。標準で有効になっていると思います。有効になっていない場合はコメントアウトを外します
# vim /etc/httpd/conf.modules.d/00-base.conf
LoadModule status_module modules/mod_status.so
Apacheの「server-status」の設定を有効にします。ローカル経由のみ表示するようにします
# vim /etc/httpd/conf/httpd.conf

<Location /server-status>
SetHandler server-status

Require all denied
Require ip 127.0.0.1
Require local
</Location>
MuninのApache関係のプラグインを、Pluginsフォルダにシンボリックリンクを作ります
# sudo ln -s /usr/share/munin/plugins/apache_accesses /etc/munin/plugins/apache_accesses
# sudo ln -s /usr/share/munin/plugins/apache_processes /etc/munin/plugins/apache_processes
# sudo ln -s /usr/share/munin/plugins/apache_volume /etc/munin/plugins/apache_volume

Muninの再起動して設定を反映します
# systemctl restart munin-node
Muninにアクセスすると、Apacheのグラフが表示されていると思います。
表示されない場合は、Cronで実行され値を取得しているので5分ほどおいてからアクセスすれば表示されると思います
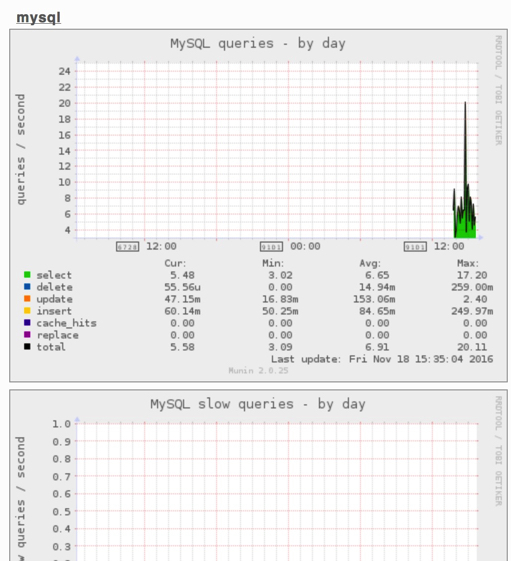
MariaDBの状態をグラフに表示する
MuninでMariaDBの負荷状況を表示をできるようにMuninの設定をおこないます
MariaDBへアクセスできる、ユーザーとパスワードを設定します
# vi /etc/munin/plugin-conf.d/munin-node
[mysql*]
env.mysqladmin /usr/bin/mysqladmin
env.mysqlopts -u root -p[パスワード]
MuninのMariaDB関係のプラグインを、Pluginsフォルダにシンボリックリンクを作ります
# ln -s /usr/share/munin/plugins/mysql_bytes /etc/munin/plugins/mysql_bytes
# ln -s /usr/share/munin/plugins/mysql_queries /etc/munin/plugins/mysql_queries
# ln -s /usr/share/munin/plugins/mysql_slowqueries /etc/munin/plugins/mysql_slowqueries
# ln -s /usr/share/munin/plugins/mysql_threads /etc/munin/plugins/mysql_threads

Muninの再起動して設定を反映します
# systemctl restart munin-node
Muninにアクセスすると、MariaDBのグラフが表示されていると思います。
表示されない場合は、Cronで実行され値を取得しているので5分ほどおいてからアクセスすれば表示されると思います

コメント